

Understanding the Role of a Kitchen Island
A kitchen island is more than just extra counter space. It’s a hub for cooking, dining, and socializing. Think of it as the heart of your kitchen.
When styled well, it boosts function and style. A cluttered island feels chaotic. A clean design invites use and admiration.
- Prep meals with ease.
- Create a spot for casual meals.
- Make it a gathering place for guests.
My friend once added an island to her small kitchen. It transformed the room into a cozy yet functional space. The change was remarkable.
Choosing the Right Size and Shape
Size matters when planning your island. Too big, and it overwhelms the space. Too small, and it feels out of place.
Measure your kitchen carefully. Leave at least 3 feet of walking space around the island. This ensures comfort and flow.
Shape also plays a role. Rectangular islands work in large kitchens. Square or oval shapes suit smaller spaces better.
I once saw a tiny round island in a studio apartment. It fit perfectly and added charm without taking over the room.
Key Materials for Durability and Style
The materials you choose affect both looks and function. Wood brings warmth but needs care. Stone offers durability but can feel cold.
Quartz and granite are popular choices. They resist stains and scratches. Stainless steel works well in modern kitchens.
Don’t forget about the base. Cabinets add storage. Open shelves display items stylishly. Mix materials for visual interest.
In my own kitchen, I paired wood countertops with white cabinets. The combo feels inviting and practical.
Lighting Your Kitchen Island
Good lighting transforms an island. Pendants hang above and create a focal point. Choose fixtures that match your style.
Hang lights 30-36 inches above the surface. This height avoids glare and provides ample light.
Dimmer switches let you adjust brightness. Brighten for prep work. Dim for relaxed dinners.
Once, I installed oversized pendant lights. They overwhelmed the space. Smaller fixtures worked much better.
Adding Functional Features
An island should work hard for you. Add outlets for appliances. Include a sink or cooktop if space allows.
Consider seating. Bar stools tuck neatly under overhangs. Leave 12-15 inches per person for comfort.
Storage is key. Drawers hold utensils. Shelves store cookbooks. Wine racks add flair.
I added a pull-out trash bin to my island. It’s a small touch but makes cleanup easier.
Color and Finish Choices
Color ties your island to the rest of the kitchen. Match it to cabinetry for cohesion. Use a bold hue to make it stand out.
Neutral tones like gray or beige blend well. Bold colors like navy or green add personality.
Finishes matter too. Matte surfaces hide fingerprints. Glossy finishes reflect light beautifully.
One client painted her island bright yellow. It became a cheerful centerpiece everyone loved.
Balancing Decor and Practicality
Decor should enhance, not overwhelm. Keep essentials within reach. Store rarely used items elsewhere.
Add a bowl of fruit or a vase of flowers. These touches bring life to the space.
Avoid clutter. Too many items make the island feel messy. Less is often more.
I keep a small tray on my island. It holds keys, mail, and other daily essentials. It’s simple but effective.
Considering Traffic Flow
Your island affects how people move through the kitchen. Place it where it won’t block pathways.
Think about door swings and appliance access. Ensure the fridge and stove are easy to reach.
A poorly placed island frustrates daily tasks. Plan carefully to avoid this issue.
A neighbor moved her island slightly during a remodel. The new layout made cooking so much easier.
Final Touches for Personalization
Make your island reflect your style. Add unique hardware. Display personal items sparingly.
Change decor with the seasons. Swap out placemats or centerpieces for variety.
Small details matter. A colorful rug or themed accessories add character.
I love switching out my island decor for holidays. It keeps the space fresh and fun.
Creative Design Ideas for Kitchen Islands That Wow
I once visited a friend’s house and was totally wowed by their kitchen island. It wasn’t just the shiny marble top or matching stools—it was how useful it felt. This wasn’t some fancy showpiece; it had purpose. And that’s what we’re talking about here: ideas to make your island both stunning and practical.
One idea I love is mixing materials. Picture this: a wooden butcher block on one side for chopping veggies, paired with sleek quartz or granite elsewhere. You get warmth and functionality in one spot. Plus, combining textures gives your kitchen depth and style. Worried about upkeep? Modern sealants make wood durable, though you might need to oil it occasionally.
Lighting can also transform an island. I saw a photo where someone hung mismatched pendant lights at different heights. Surprisingly, it worked. Stick to the same color or style for balance. Go industrial with black metal fixtures or soft with frosted glass or woven rattan shades. Lighting sets the mood, so make it special.
Functional Layouts That Actually Work
No matter how pretty your island is, if it doesn’t work well, you’ll hate it. Trust me, I’ve seen islands that were more decorative than functional. Let’s focus on smart layouts without sacrificing style.
Think about zones. Your island doesn’t need to do everything at once. Divide it into sections. For example, one corner could be a prep zone with knives, cutting boards, and spices. Another could hold appliances like a built-in cooktop or fryer. Don’t forget storage underneath! Pull-out drawers or open shelves are perfect for pots, pans, or cookbooks.
Here’s a tip: use deep drawers instead of cabinets. They’re easier to organize and great for bulky items like baking sheets. My sister added vertical dividers in her drawers for cutting boards and cookie sheets. Total game changer.
- Zone 1: Prep area with knife block and cutting boards.
- Zone 2: Cooking station with integrated appliances.
- Zone 3: Storage for essentials like pots, pans, and utensils.
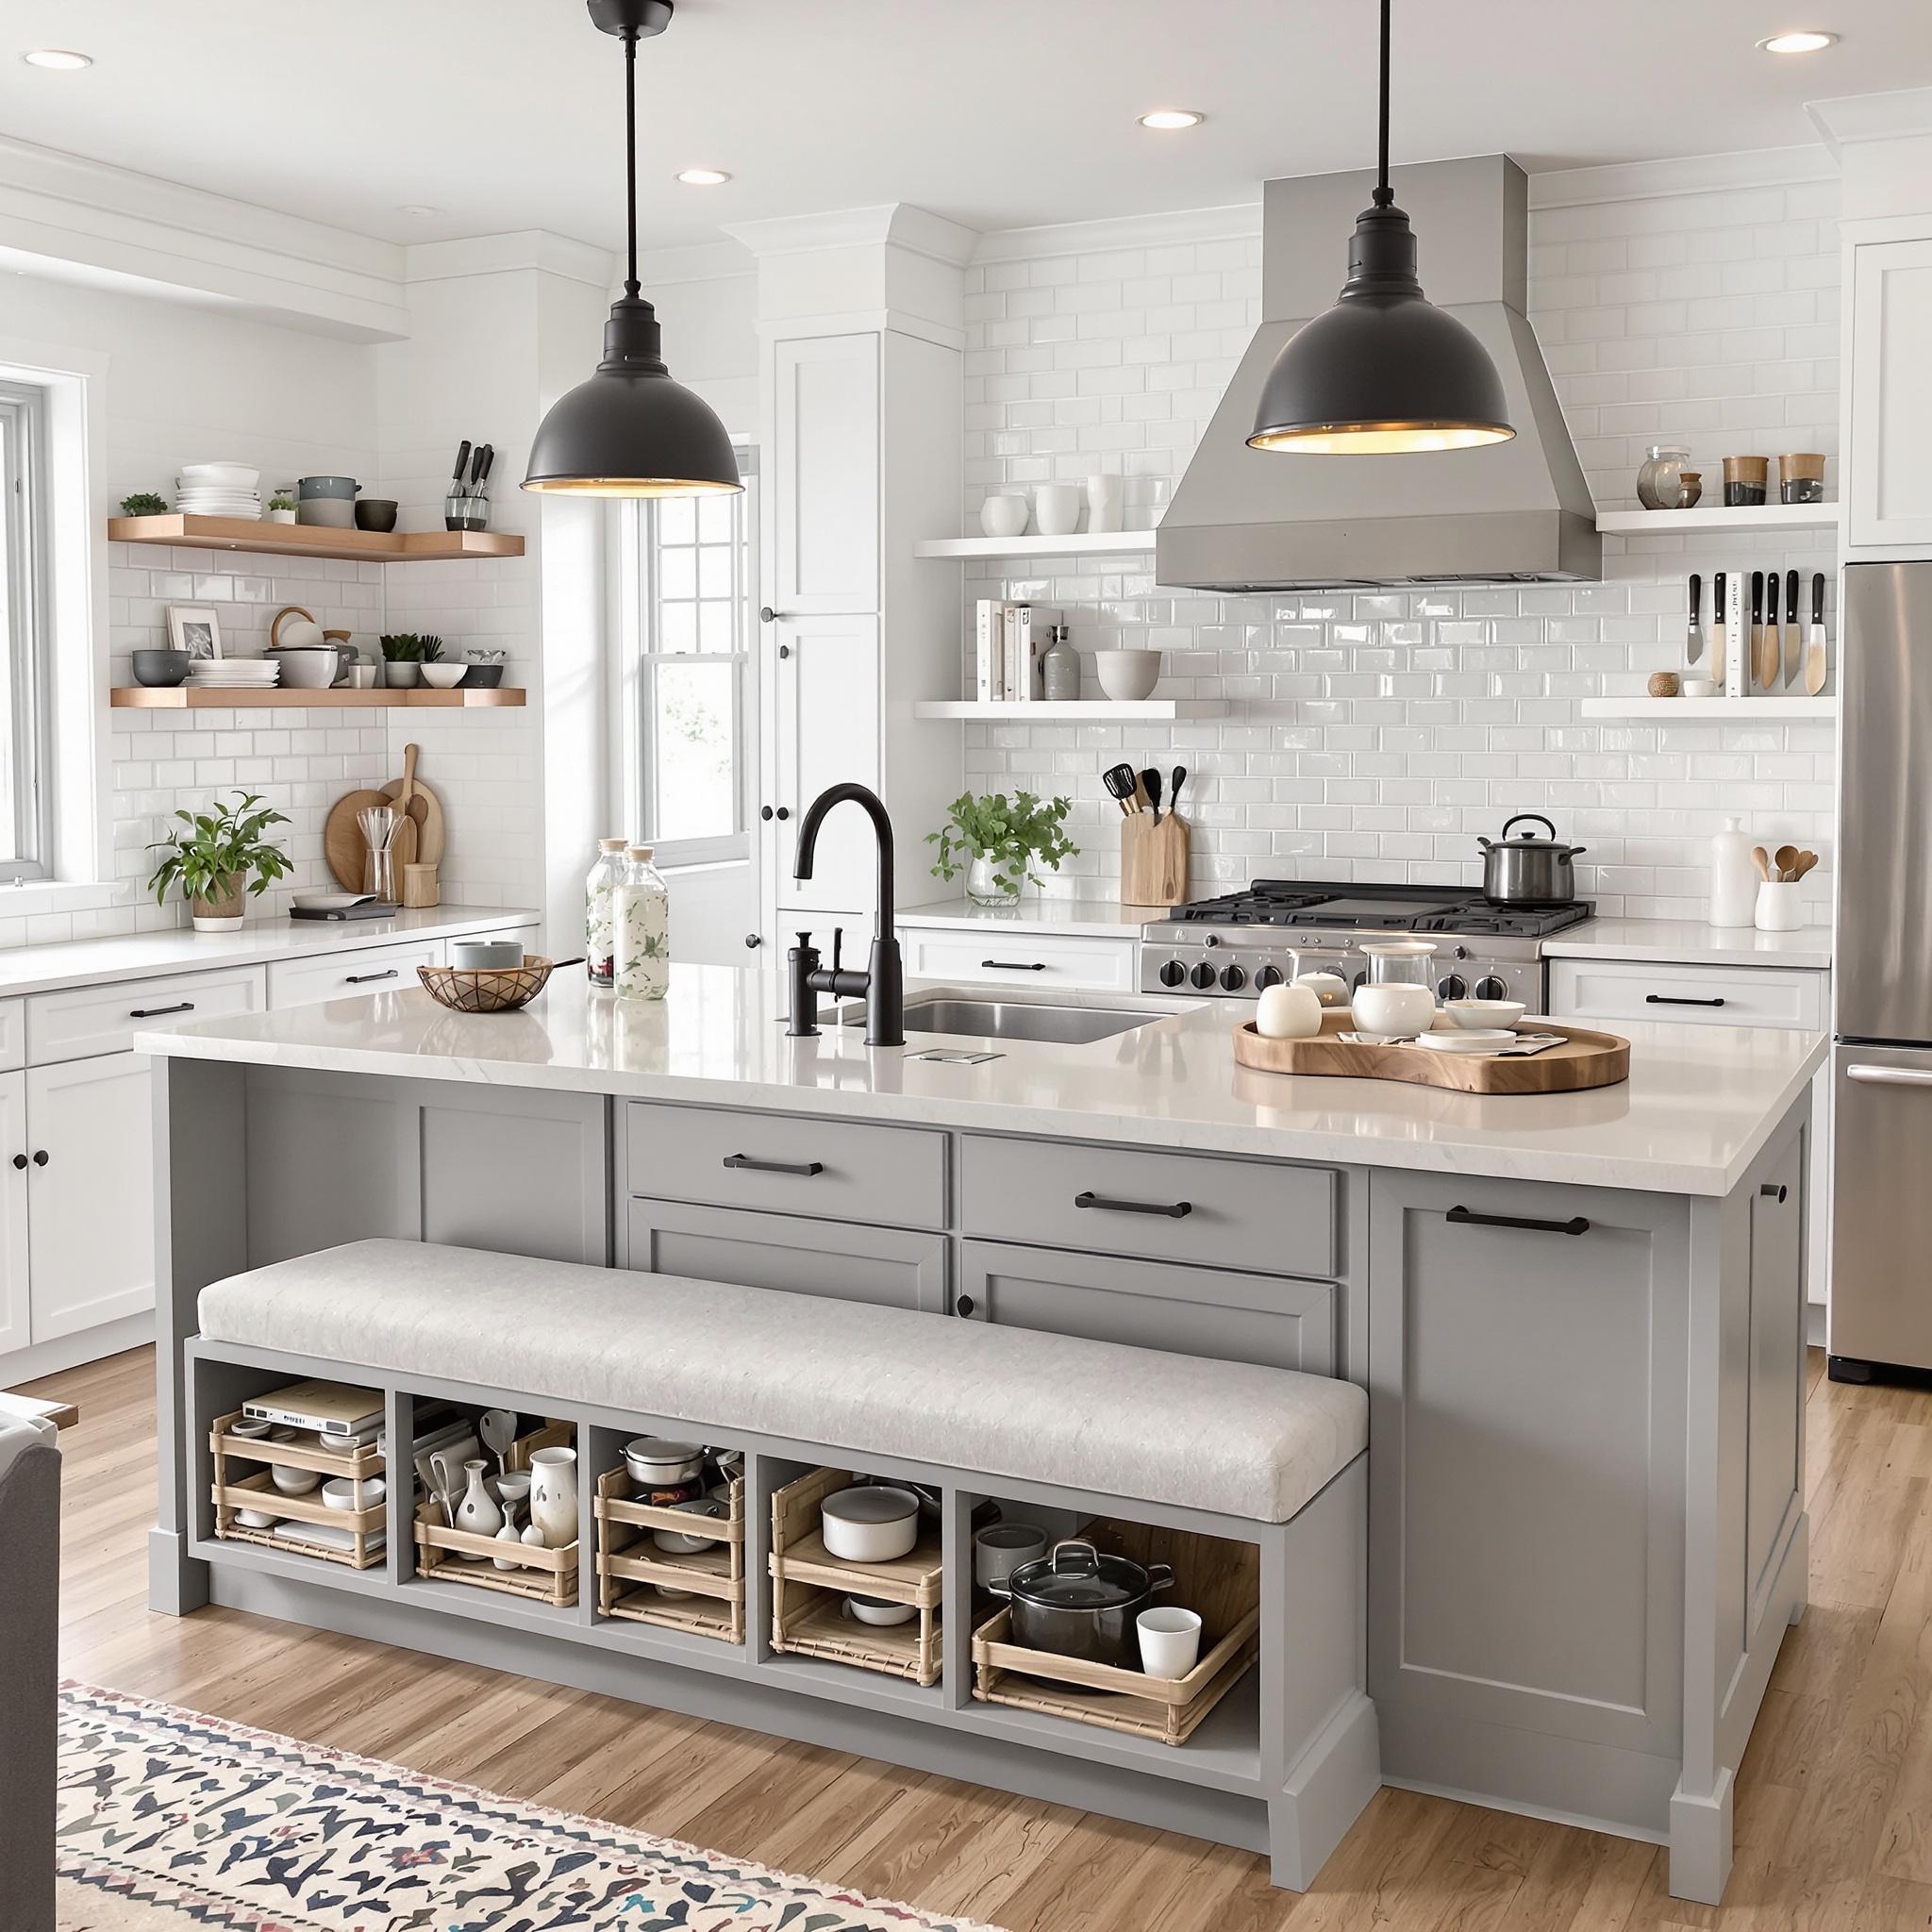
Why not add seating with hidden storage? Benches with compartments underneath save space and keep things tidy. Kids’ school supplies or extra linens? Toss them in there. Hidden storage feels like magic—you don’t realize how much you need it until it’s gone.
Adding Personality Through Details
Now, let’s have some fun. Your island should reflect *you*. Whether you like bold colors, quirky patterns, or clean lines, there’s a way to make it happen. Try painting the base a bold shade like navy blue or emerald green. Or go two-tone—neutral on one side, pop of color on the other. Super trendy right now.
Backsplashes behind the island offer endless options. Subway tiles are classic, but geometric patterns or reclaimed wood can add flair. My neighbor used hexagonal tiles in soft gray, and it gave her kitchen an artsy vibe. Just make sure it matches the rest of your decor.
And plants? Adding greenery is simple yet effective. A small herb garden looks cute and gives you fresh herbs. If live plants stress you out, high-quality faux ones work too. No shame in that.
Making Room for Technology
Tech is everywhere, and your island shouldn’t miss out. Think charging stations, built-in speakers, or tablet holders. Imagine cooking while streaming music or following recipes hands-free. Sounds nice, right?
I saw an island with a pop-up outlet strip in the countertop. At first glance, it looked normal, but when needed, outlets popped up. Genius. If rewiring isn’t an option, portable charging pads are a solid alternative.
Don’t forget smart appliances. Refrigerated drawers or wine coolers are perfect for entertaining. Guests can grab chilled drinks straight from the drawer. Talk about convenient.
Small Kitchens? No Problem!
What if your kitchen is tiny? Does that mean no island? Nope. There are plenty of ways to add a functional island, even in small spaces. Rolling carts are great—they’re lightweight, movable, and often come with shelves or drawers. When done, just wheel it away.
Another option is a narrow, peninsula-style island. These attach to walls or counters, saving space while adding workspace. You’d be surprised how much difference a slim island makes. Add barstools along one side for casual dining or homework.
Here’s a trick: mirrors. Install mirrored backsplashes or cabinet doors near your island. They bounce light around and make the room feel bigger. Just saying.
Final Thoughts Before Wrapping Up
There you have it—a bunch of creative ideas and functional tips for your kitchen island. From mixing materials to creating zones, there’s no shortage of ways to make your island beautiful and practical. If you’re stuck, Pinterest is full of inspiration.
Your kitchen island is more than furniture—it’s the heart of your home. Make it yours. Add personal touches, play with colors, and don’t be afraid to try something new. The best designs tell a story.

Final Touches That Make Your Kitchen Island Shine
You know what they say—the little things matter. And when it comes to your kitchen island, small details can make a big difference. The best part? You don’t need to spend a fortune. It’s all about mixing textures, colors, and practicality. Let me explain.
First, lighting. Overhead lights are fine, but they’re not everything. A statement pendant light above your island can transform the space. I once replaced a cheap flush mount with a vintage brass pendant from a thrift store—it cost $30 and completely changed the vibe. If you’re into DIY, repaint an old fixture to match your style. Just make sure the size fits your island. Too small, and it disappears. Too big, and it takes over.
Don’t forget under-cabinet lighting if your island has shelves or storage. LED strips aren’t just useful—they add a warm glow that makes late-night snacks feel cozy. Go dimmable so you can adjust the brightness for cooking or hanging out.
Accessorize Without Overdoing It
A bare countertop feels incomplete, but too much stuff makes it chaotic. So how do you find balance? Choose items that are both pretty and practical. A stylish fruit bowl holds snacks *and* looks good. Same goes for cutting boards, utensil jars, or a sleek knife block.
I learned this the hard way. I overloaded my island with candles, plants, cookbooks—you name it. Then one day, I needed space to roll out dough, and there was nowhere to work. Lesson learned: keep it simple but meaningful. Stick to three key pieces—a plant, something functional, and maybe a pop of color—and switch them up seasonally.
Speaking of plants—if you haven’t added greenery yet, start now. A small herb garden works great. Fresh basil or rosemary within reach is super handy. If you’re bad at keeping plants alive (*raises hand*), try succulents or snake plants. They’re hard to kill.
Maintenance Hacks to Keep Things Looking Sharp
Let’s be honest—life happens. Spills, scratches, stains—they’re bound to occur. But with a few tricks, you can keep your island looking great without much effort.
Here’s one I love: microfiber cloths and a spray bottle with water and vinegar. Sounds simple, right? It works. Coffee rings, crumbs, sticky fingerprints—all gone in seconds. Bonus: wash the cloth instead of using paper towels every time. Eco-friendly and budget-smart.
For tougher messes, like grease or stubborn marks, use baking soda paste. Mix baking soda with water, then scrub gently. It’s amazing on granite, stainless steel, and wood. Skip harsh chemicals unless absolutely necessary—they can damage finishes over time.
Funny story: last Thanksgiving, someone spilled red wine on my white quartz. Panic hit, but I grabbed club soda, poured it on the stain, and blotted it up. Worked like a charm. Moral of the story? Always have a backup plan—and maybe avoid red wine near white countertops during parties.
Add Personal Flair to Make It Yours
At the end of the day, your kitchen island should reflect *you*. Display family photos, use heirloom cookware as decor, or paint the base a bold color that shows off your personality. Let it tell your story.
Take my grandma, for example. She always kept her rolling pin out because it reminded her of baking pies with her mom. Now, seeing mine out brings back memories of frosting cakes with her. Little touches like that make a house feel like home.
Another idea? Change things up with the seasons. Swap dish towels, placemats, or centerpiece decor. Think pastels for spring, beachy vibes for summer, warm tones for fall. Keeps things fresh and gives you a reason to refresh your space.
Wrap-Up: Creating a Kitchen Island You’ll Love
Your kitchen island isn’t just furniture—it’s the heart of your home. Focus on thoughtful design, practical upkeep, and personal touches to make it both beautiful and useful. Perfection isn’t the goal. Create a spot where life happens. Whether you’re cooking, chatting, or sipping coffee, let your island reflect what matters most to you.
FAQs About Decorating and Maintaining Your Kitchen Island
- Q: How do I choose the right size pendant light for my island?
A: Leave 30-36 inches between the light and countertop. The light’s width should be about half the island’s width. - Q: Can I paint my existing kitchen island?
A: Yes! Sand it down, apply primer, and use high-quality paint for cabinets or furniture. It’s an easy update. - Q: What’s the easiest way to clean marble countertops?
A: Use mild dish soap and warm water daily. Avoid vinegar—it can damage the surface. Seal periodically to prevent stains. - Q: Should I add seating to my kitchen island?
A: If you have space, yes! Bar stools create a casual spot to eat or hang out. Just leave enough legroom underneath. - Q: How often should I deep clean my kitchen island?
A: Do a thorough clean once a month. Regular wipe-downs handle everyday messes. - Q: Is it okay to use wooden cutting boards on stone countertops?
A: Yes, but slide them gently to avoid scratches. They also look nice as decor when not in use. - Q: What are some eco-friendly ways to maintain my island?
A: Use natural cleaners like vinegar and baking soda. Opt for reusable cloths instead of paper towels. Try sustainable materials like bamboo for accessories. - Q: How do I hide clutter on my island?
A: Use baskets or bins underneath for storage. Keep only essentials visible and stash extras in drawers or cabinets. - Q: Can I mix metals in my kitchen island decor?
A: Yes! Mixing metals adds interest. Stick to two or three finishes, like brass and matte black. - Q: How do I protect my island from heat damage?
A: Always use trivets or hot pads under pots and pans. Never place hot items directly on the surface.