
Why a Headboard Wall Matters
A headboard wall sets the mood for your bedroom. It’s more than just decor—it’s a focal point.
Think about walking into a room. Your eyes need something to land on. A styled headboard wall does that job.
It’s not just about looks. A well-done headboard wall can make a small space feel bigger or cozier.
I once helped a friend redo her bedroom. She added simple shelves behind her bed. Instantly, her room felt warmer.
Benefits of Styling Your Headboard Wall
Styling this wall offers practical perks. Here’s what you gain:
- Better room flow and balance.
- An easy way to show off your style.
- A cozy spot that invites relaxation.
- More storage with clever designs.
For example, adding floating shelves gives you space for books or plants. You get function and flair in one step.
Another bonus? It’s budget-friendly. You don’t need expensive furniture. Small changes can make a big impact.
Basic Elements of a Styled Headboard Wall
You don’t need fancy tools or skills. Start with these basics:
- Pick a color or theme.
- Add texture with materials like wood or fabric.
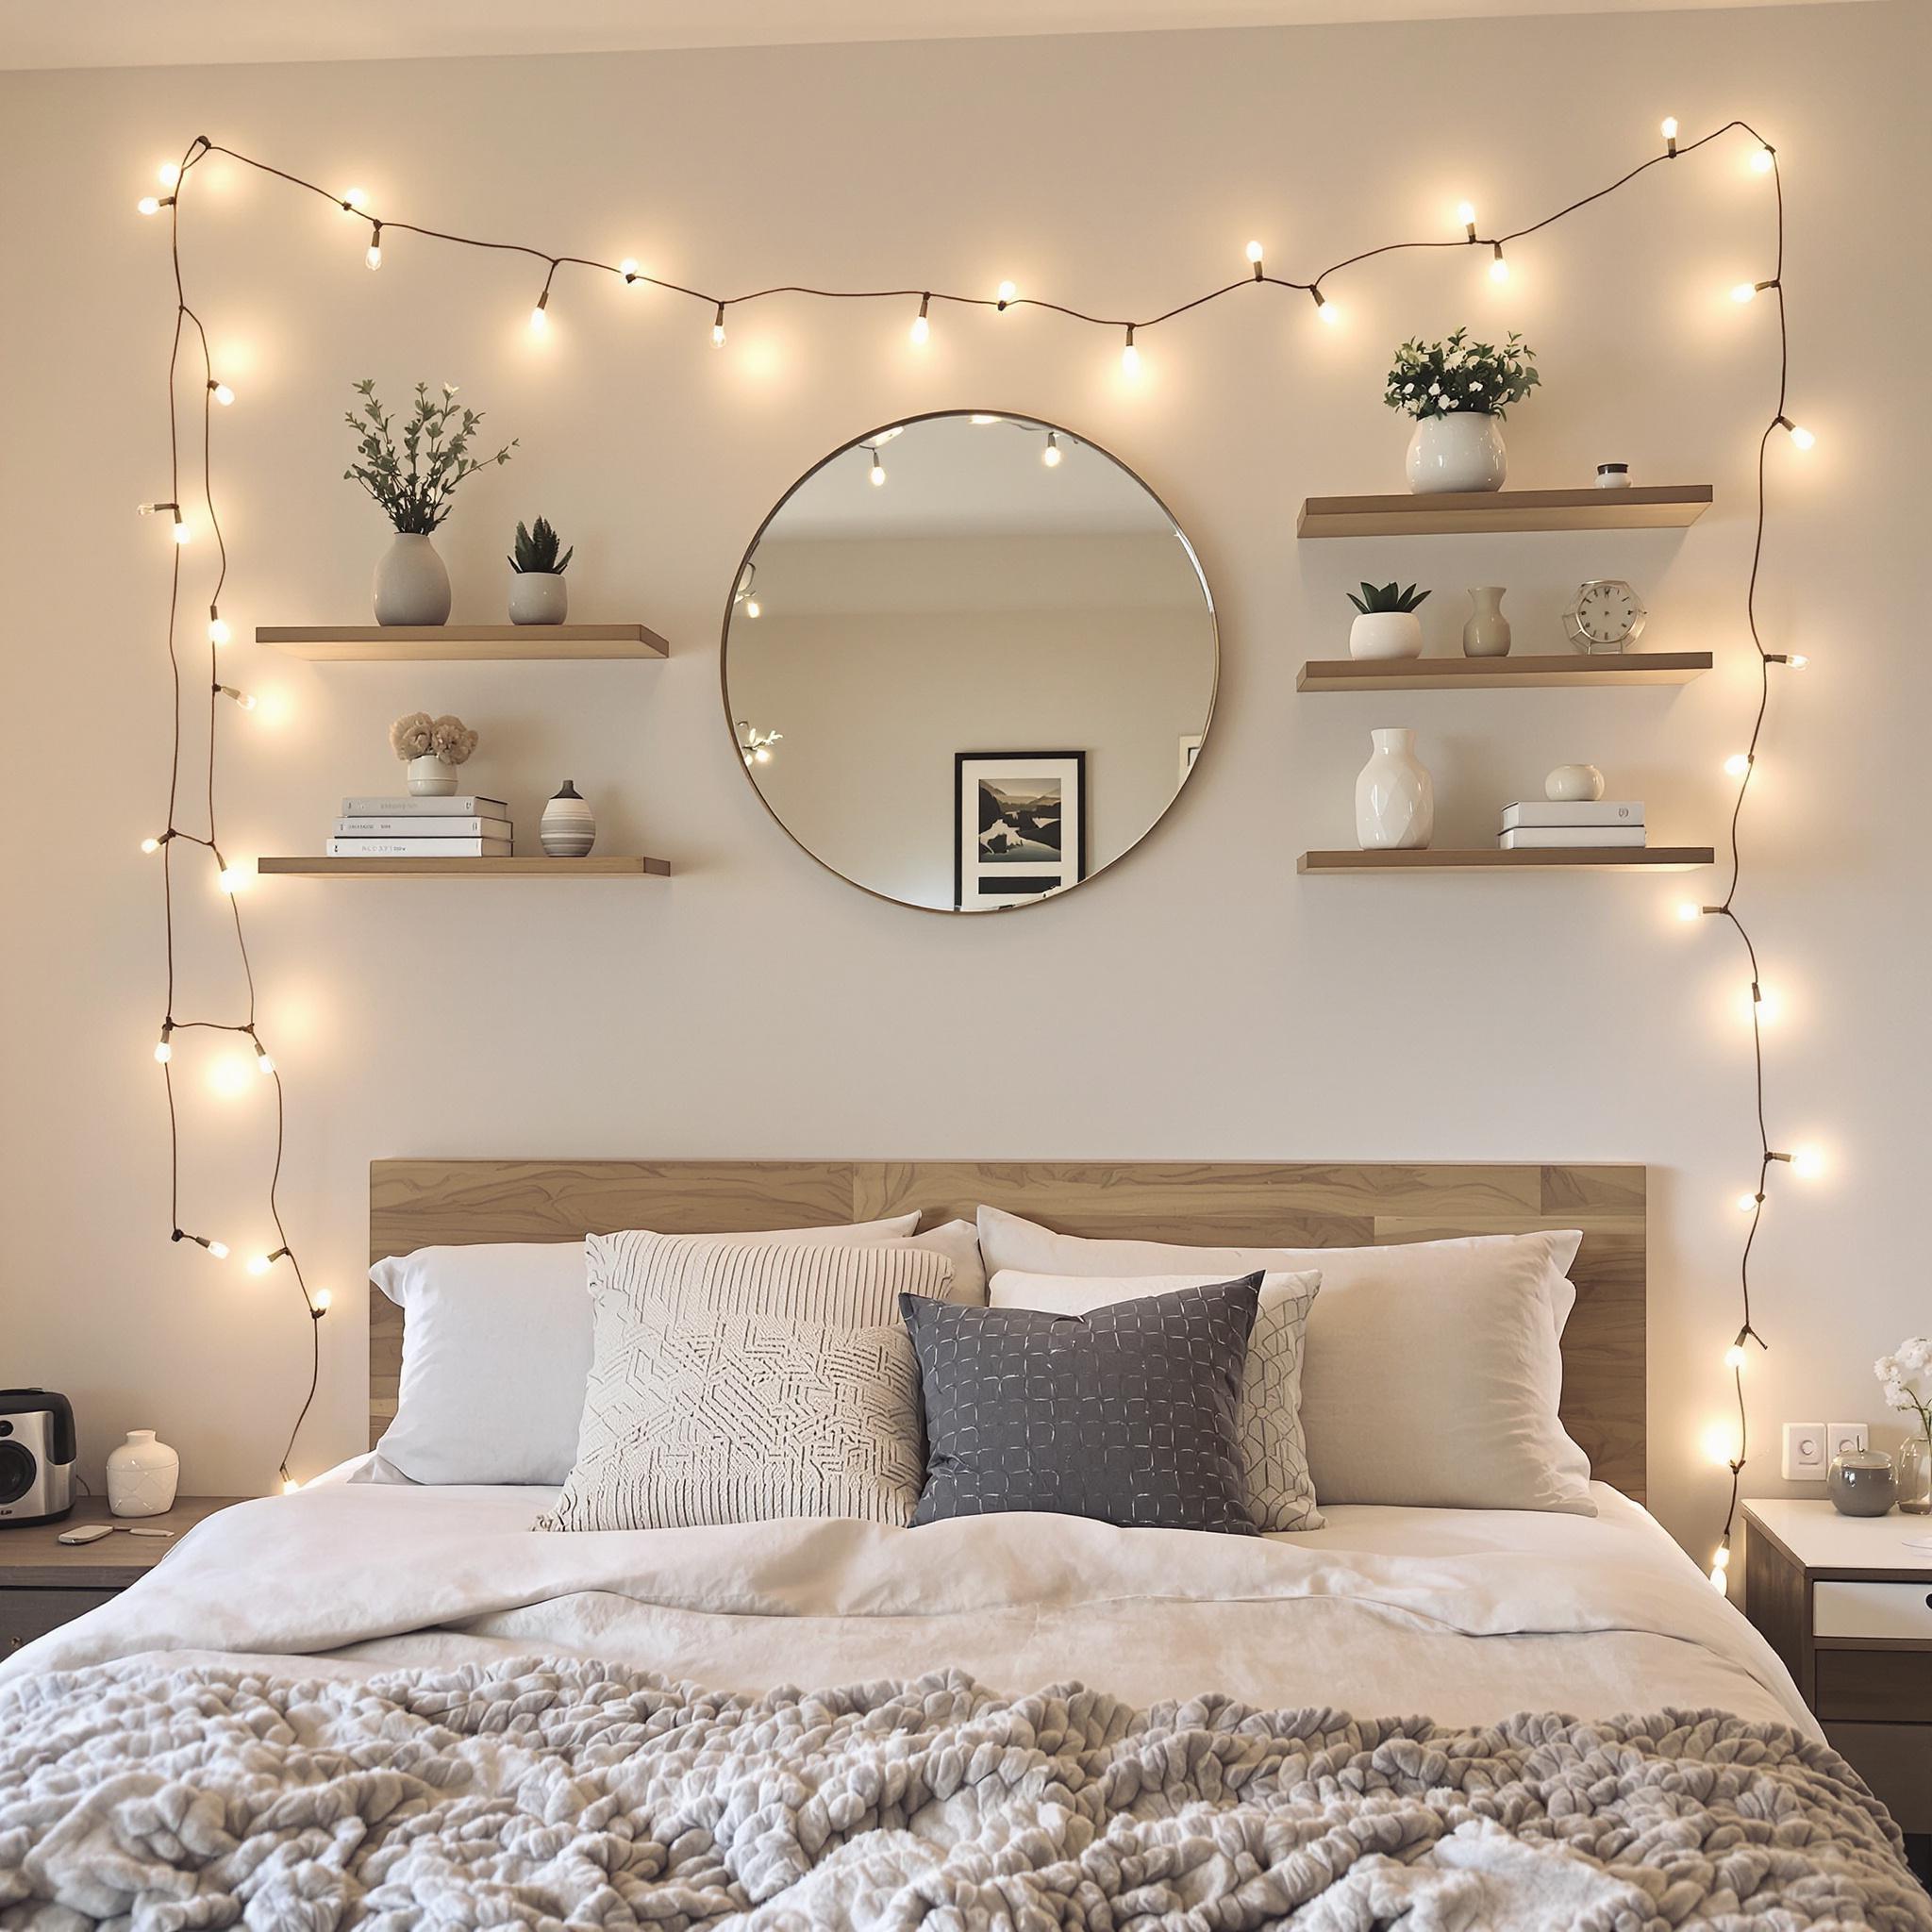
- Include lighting for warmth.
- Use decor items like art or plants.
Think about how these pieces work together. A bold color might pair well with simple decor.
Texture is key. I once used a woven tapestry behind my bed. It made the whole room feel softer.
Choosing Colors That Work
Color sets the tone for your bedroom. Light colors make spaces feel airy. Dark tones add drama.
Stick to shades that match your bedding. If your sheets are neutral, go bold on the wall.
Test paint samples first. Lighting changes how colors look. Morning sun makes walls brighter.
If painting feels like too much, try removable wallpaper. It’s an easy fix you can swap later.
Adding Texture for Interest
Texture makes a wall pop. It adds depth without clutter.
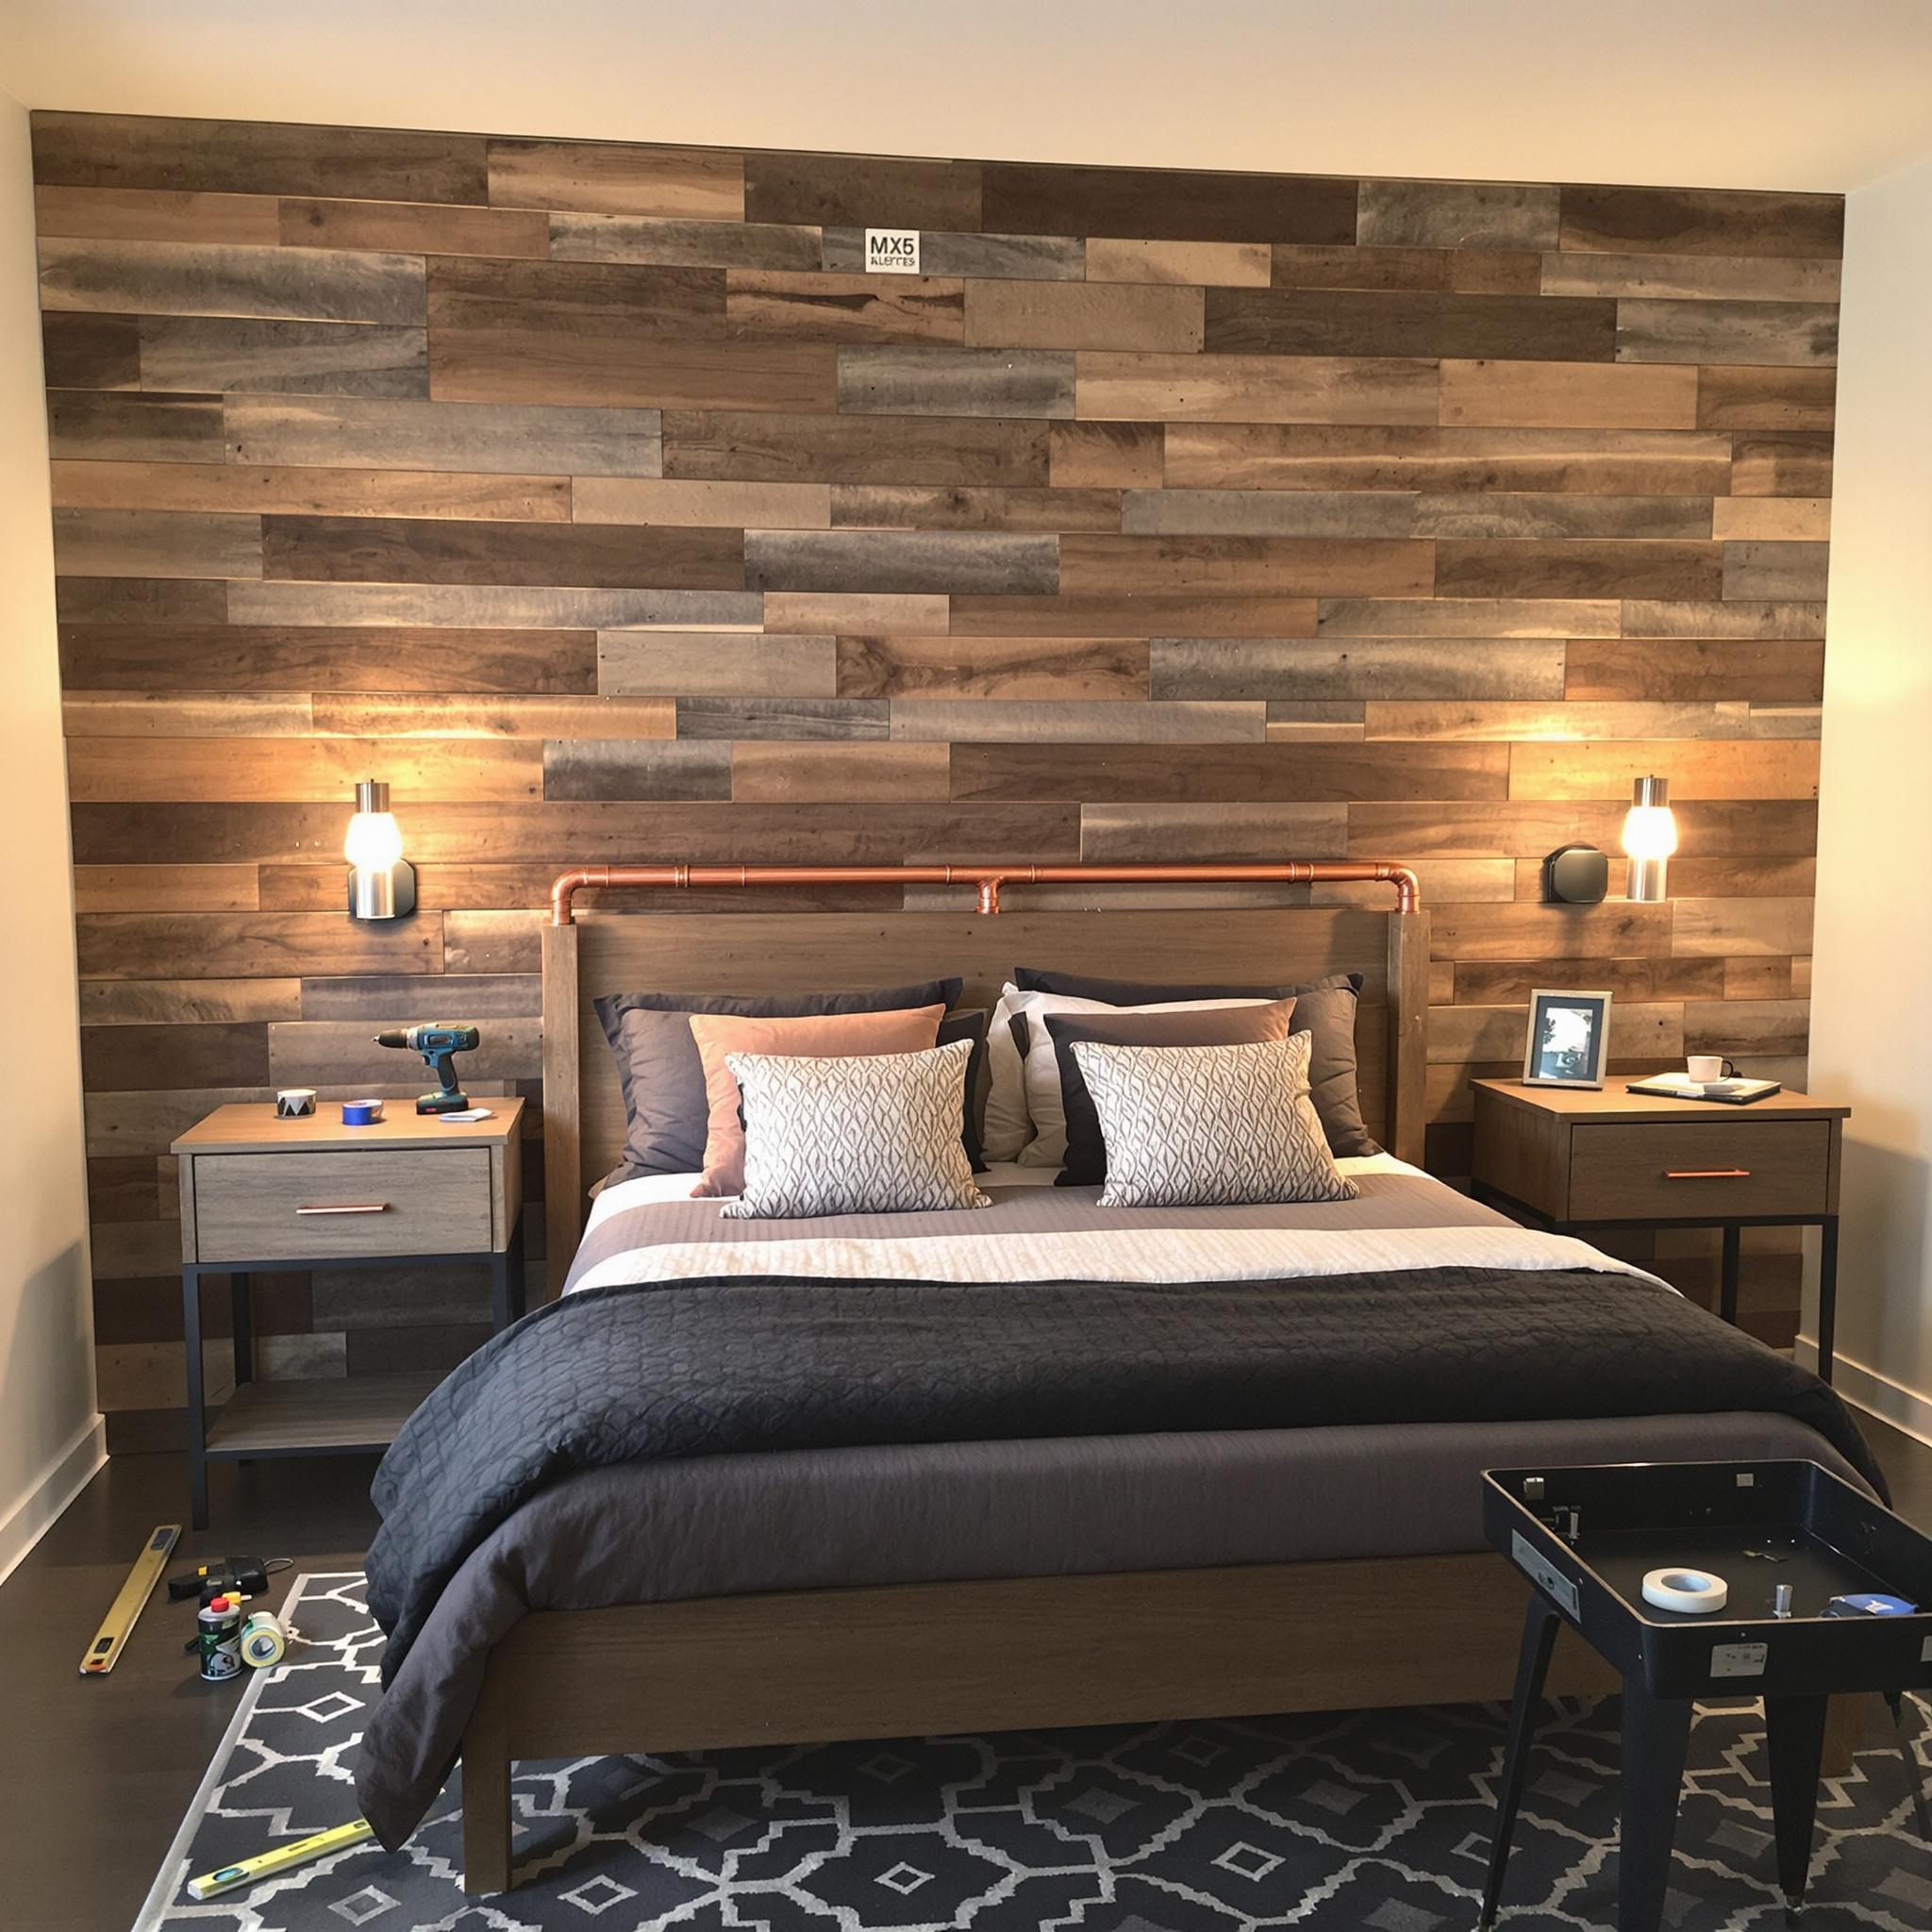
Wood panels bring warmth. Brick or stone adds an industrial edge. Fabric softens the vibe.
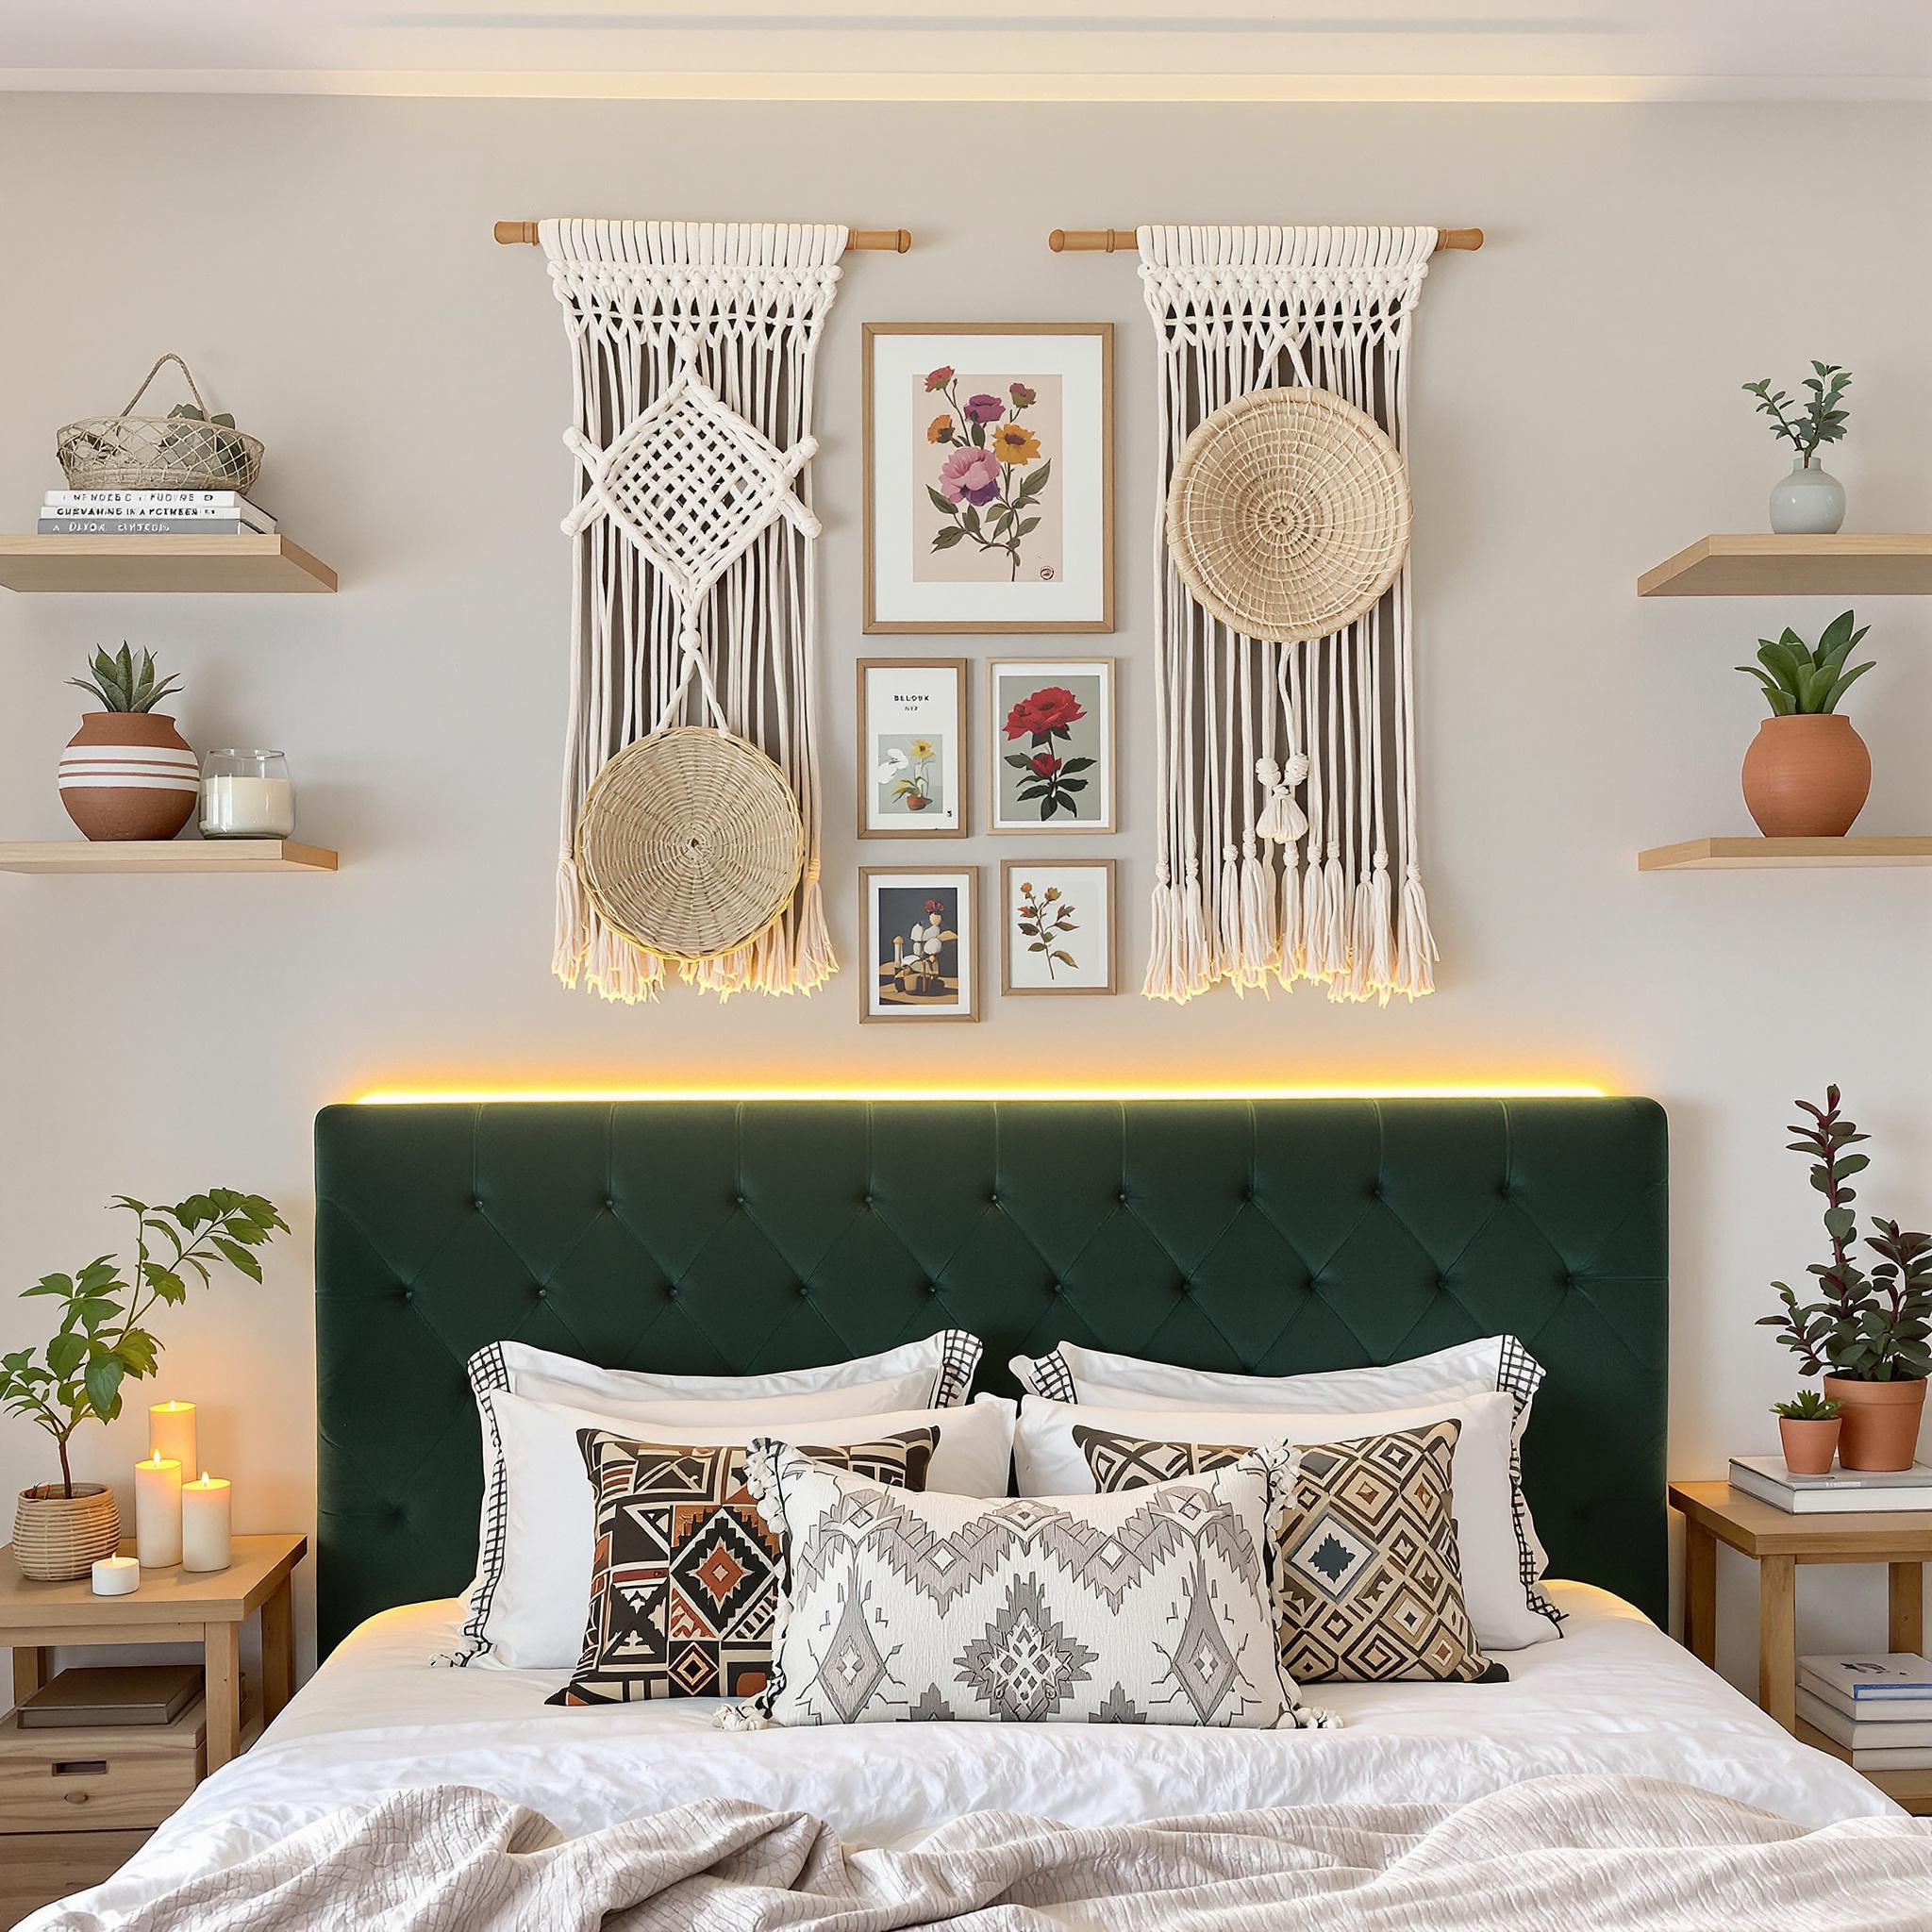
Even small details count. A quilted headboard or macrame wall hanging works wonders.
Experiment with layers. Mix smooth and rough textures. For instance, pair sleek metal frames with a fluffy rug.
Lighting to Enhance the Look
Lights transform any headboard wall. They create ambiance and highlight decor.
Sconces save nightstand space. String lights feel whimsical. LED strips offer modern flair.
Warm bulbs feel cozy. Cooler tones suit minimalist styles. Pick based on your mood.
Dimmer switches let you adjust brightness. Perfect for movie nights or reading sessions.
Decorating Without Overdoing It
Less is often more. Too many items can overwhelm the space.
Start with one standout piece. Maybe it’s a large mirror or framed artwork.
Balance big items with smaller ones. A tall plant next to a short shelf looks great.
Keep things symmetrical. Matching lamps or art on both sides feels tidy.
Leave some empty space. Breathing room keeps the design fresh.
Making It Personal
Your headboard wall should tell your story. Add items that mean something to you.
Photos, travel souvenirs, or handmade crafts work well. These pieces make the space yours.
Change decor with seasons. Swap summer florals for winter greens. Keeps things exciting.
Don’t stress about perfection. Your style evolves. Let your wall grow with you.
Choosing the Right Materials for Your Headboard Wall
Alright, you’ve got a vision in mind. Maybe it’s bold and dramatic, or maybe it’s cozy and understated. Now, it’s time to figure out what materials will make that vision real. There are tons of options, which can feel both exciting and overwhelming.
Funny story—I once went to a home improvement store just to look around. I left with shiplap boards, velvet swatches, and a bunch of random stuff I didn’t even need. It happens to everyone. So relax, take your time, and don’t rush into buying everything at once.
If you’re going for a rustic vibe, reclaimed wood is a great choice. It adds warmth and texture, plus it has character. Imagine telling guests, “This came from an old barn in Vermont.” Instant conversation starter. You can find reclaimed wood at salvage yards or online on sites like Etsy. Just make sure it’s treated so you don’t bring home any unwanted bugs.
On the other hand, if you like modern minimalism, try sleek materials like metal panels or glossy acrylics. These work well in small spaces because they reflect light and make rooms feel bigger. Worried about installation? Acrylic sheets often come with adhesive strips now. Super easy to put up.
Here’s a quick breakdown of materials based on style:
- Rustic: Reclaimed wood, beadboard, stone veneer.
- Modern: Metal panels, acrylic, glass tiles.
- Luxurious: Velvet upholstery, leather panels, tufted fabric.
- Eco-friendly: Bamboo, cork, recycled plastic composites.
Mixing textures can also add interest. A friend combined dark-stained wood planks with copper piping accents. It looked amazing. People always asked where she bought it. Spoiler: she made it herself.
—
Measuring and Planning the Layout
Now comes the less fun part: measurements. Math might not be exciting, but it’s important. Trust me, realizing halfway through that your design doesn’t fit is a nightmare. I learned that the hard way.
Start by measuring the width and height of your bed area. Don’t forget nightstands or nearby furniture. A good rule of thumb is to extend the design slightly beyond the bed frame for balance. For example, if your bed is 60 inches wide, aim for a total wall treatment around 80-90 inches wide. This gives it a polished look.
Planning the layout is kind of like playing Tetris. You want everything to fit without looking cluttered. If you’re using multiple panels or boards, lay them out on the floor first. Take a picture for reference—it really helps later.
Oh, and don’t forget lighting! Adding sconces or LED strip lights above or behind your headboard wall can make a big difference. Soft, ambient lighting beats harsh overhead lights any day. My favorite setup involves adjustable reading lights mounted on the wall. Stylish and practical.
—
DIY Installation Tips and Tricks
Let’s talk installation. Depending on your skill level, this might sound intimidating—or totally doable. Spoiler: it’s probably easier than you think. Plus, there’s something satisfying about standing back and saying, “I did that.”
First, gather your tools. Here’s what you’ll likely need:
- Level (crooked walls are never a good look)
- Drill and screws (or adhesive strips for lighter materials)
- Studs finder (don’t skip this step)
- Painters tape (for marking placement)
- Sandpaper (if working with raw wood)
One mistake I made early on? Skipping the stud finder. Big oops. Drywall anchors aren’t always reliable for heavy materials. Always locate the studs before drilling.
For shiplap or board-and-batten projects, start by installing vertical furring strips along the studs. This creates a solid base for attaching your boards. Funny story: my husband and I spent a whole Saturday on this, only to realize we hadn’t aligned everything properly. Third time was the charm!
If you’re upholstering a padded headboard, patience is key. Foam padding, batting, and fabric layers require precise stapling. Trim excess carefully, and don’t hesitate to ask for help. Wrestling with fabric alone is no joke.
—
Budget-Friendly Alternatives and Hacks
Not everyone has unlimited funds for fancy materials or professional help. But guess what? You don’t need to spend a fortune to create something impressive. Some of the best designs I’ve seen were born from creativity and resourcefulness.
Take paint, for example. With techniques like color blocking or faux finishes, you can transform a plain wall into something stunning. Try painting geometric shapes or experimenting with metallic tones. Use painter’s tape for clean lines. Precision matters.
Another budget-friendly option? Wallpaper. Peel-and-stick varieties have improved a lot. They offer everything from tropical prints to textured grasscloth looks. Easy to apply and remove, making them perfect for renters. I redid a guest room with floral peel-and-stick wallpaper for under $50. Great value.
Upcycling is another smart route. Old doors, shutters, or pallets can become unique statement pieces with some effort. Sand them down, add a fresh coat of paint, and you’re done. One of my neighbors turned a vintage door into a sliding barn-style headboard. Genius idea.
—
Avoiding Common Pitfalls
Before we wrap this up, let’s talk about common mistakes people make. Knowing these ahead of time can save you stress—and money—later.
First, overcomplicating things. Sometimes simpler is better. Resist the urge to cram too many elements into one space. Stick to two or three complementary textures max.
Next, poor lighting choices. Harsh fluorescents or mismatched bulbs can ruin the mood fast. Go for warm, dimmable lights instead. Test the color temperature before buying. Cold blue lighting screams “office building,” not bedroom.
Lastly, neglecting functionality. Aesthetics matter, but comfort should come first. Make sure your design allows easy access to outlets, bedside tables, and other essentials. What’s the point of a beautiful space if it’s impractical?
—
There you have it—a guide to creating your dream headboard wall. Whether you’re a DIY pro or a beginner, remember every project has its ups and downs. Embrace the process, learn as you go, and most importantly, have fun with it.
Advanced Tips and Inspirations for Elevating Your Headboard Wall Aesthetic
You know how it goes—small changes can make a huge impact. This is especially true for your headboard wall. Let’s get into some creative ideas to take your space from blah to amazing. Once you try these, you’ll wonder why you didn’t start sooner.
First, let’s talk lighting. It’s the secret sauce that ties everything together. Imagine soft sconces on either side of your bed, giving off just enough light to feel cozy but not too bright. I once skipped adding lights because it seemed like too much work. Big mistake. When I finally added dimmable wall lights, my room felt like a fancy hotel. If wiring sounds like a hassle, no worries. Plug-in options are everywhere now and look just as good.
- Go for adjustable swing-arm sconces—they’re super flexible.
- LED strip lights behind your headboard give a modern glow.
- A bold pendant light above the bed adds drama without clutter.
Just don’t overdo it. Pair bold lighting with simpler decor to keep things balanced.
Now, texture. Adding texture makes your wall stand out. Paint and wallpaper are great, but think bigger. Fabric panels? Yes, please. Upholstered walls are trending for a reason—they’re luxurious and practical. I walked into a friend’s place once and her tufted velvet wall stopped me in my tracks. It was beautiful and made the room feel warm.
If fabric walls aren’t your thing, layer textures instead. Hang a macramé piece or add woven baskets for a boho vibe. Even a textured throw at the foot of the bed can pull it all together. Mix materials like wood, metal, and fabric for interest. But don’t go crazy—you want harmony, not chaos.
Funny story: I tried hanging a tapestry behind my bed once. It clashed horribly with my curtains. Lesson learned—always consider how new pieces fit with what’s already there. Color coordination matters too. Bold contrasts can work, but sticking to a cohesive palette often feels more calming.
DIY Ideas That Won’t Break the Bank
Not everyone has endless cash for decor—and honestly, DIY projects are way more fun. You get to be creative and save money. Plus, there’s something satisfying about saying, “I did this myself.”
One idea I love is a gallery wall around your headboard. Don’t just slap up random frames, though. Curate it thoughtfully. Mix family photos, art prints, and small objects like vintage clocks or pressed flowers. Vary sizes and shapes for visual interest. Pro tip: lay it all out on the floor first to see how it flows before grabbing the hammer.
Another budget-friendly option? Painted murals. You don’t need to be an artist. Start with simple geometric patterns or abstract shapes. Feeling brave? Try something nature-inspired, like mountains or trees. I once painted a sunset mural in my guest room. It wasn’t perfect, but people loved the effort. Sometimes imperfection adds charm.
Here’s a random thought: repurpose old stuff! Turn that antique door you found into a unique headboard. Use leftover tiles to create a mosaic accent wall. You’d be surprised what treasures you already have.
Making It Personal: Adding Meaning to Your Space
At the end of the day, your bedroom should reflect *you*. Trends come and go, but personal touches last. Display travel souvenirs, heirlooms, or artwork by loved ones. Make it yours.
For example, I pin postcards from places I’ve visited near my bed. Every time I see them, I’m reminded of great memories. It’s subtle but meaningful. Cultural references work too. Love mid-century design? Add clean lines and retro colors. Obsessed with Moroccan vibes? Layer rugs and use intricate tilework.
Here’s another idea: use scent strategically. Candles, diffusers, or sachets can bring back memories. Lavender might remind you of a spa day, while citrus could take you back to summer vacations. Scent may seem unrelated to walls, but it enhances the overall vibe.
Don’t forget functionality. Storage solutions can double as decor. Floating shelves offer display space and keep essentials handy. Who says storage has to be boring? Go for colorful bins or unique organizers to add personality.
Final Thoughts
Elevating your headboard wall isn’t just about looks—it’s about creating a space that feels like home. Whether you play with lighting, textures, or DIY projects, aim to make it authentically yours. Take risks, have fun, and enjoy the process. Your bedroom should reflect what you love.
FAQs
1. How do I choose the right size for my headboard?
Match it to your bed and room size. It shouldn’t stick out too far past the mattress. Measure twice!
2. Can I use wallpaper on just part of my wall?
Yes! Accent walls let you try bold patterns without overwhelming the space. Just finish the edges cleanly.
3. What’s the best type of lighting for reading in bed?
Swing-arm sconces or adjustable lamps give focused light without taking up nightstand space.
4. How do I prevent my gallery wall from looking messy?
Plan your layout first using paper templates. Stick to a theme or color scheme to keep it organized.
5. Is it okay to mix different styles in my bedroom?
Absolutely! Mixing styles adds character. Just balance sleek modern pieces with rustic elements.
6. Should I paint my ceiling to match my headboard wall?
Not always. A contrasting ceiling can make the room feel bigger. Test swatches first!
7. How do I hang heavy items like shelves safely?
Use anchors designed for your wall type and follow instructions carefully.
8. Can I use mirrors to enhance my headboard wall?
Yes! Mirrors reflect light and make the room feel larger. Leaning one against the wall works too.
9. What’s a good alternative to traditional headboards?
Try upholstered panels, painted designs, or a row of framed art hung horizontally.
10. How often should I update my bedroom decor?
There’s no set rule. Refresh when it feels stale or when inspiration hits. Small changes, like swapping pillows, can make a big difference.