

Why DIY Wall Decor is a Great Choice for Kids’ Rooms
DIY wall decor brings life to kids’ rooms. It adds personality and charm. Store-bought decor can feel impersonal. Making your own is budget-friendly too. Parents often spend less while achieving more.
Kids love spaces that reflect their interests. A DIY project lets you tailor designs to their tastes. Whether they adore animals, stars, or rainbows, the options are endless. Custom decor makes their room truly theirs.
Another perk? It’s eco-friendly. Repurposing old materials reduces waste. For example, old fabric scraps can become colorful wall hangings. This teaches kids to value sustainability early on.
Psychological and Developmental Benefits of Involving Kids in Creative Projects
Getting kids involved boosts their confidence. They see tangible results from their efforts. Completing a project gives them a sense of pride.
Creative projects also improve problem-solving skills. Kids learn to think outside the box. For instance, deciding how to arrange shapes on a wall sparks critical thinking.
These activities encourage self-expression too. Kids can pick colors and patterns they love. This helps them develop their unique identity. Plus, working together strengthens family bonds.
Studies show creativity lowers stress in kids. Focusing on a fun task calms their minds. It’s a healthy break from screens and schoolwork.
How to Plan Your DIY Project: Budgeting, Themes, and Color Schemes
Start with a budget. Decide how much you’re willing to spend. DIY doesn’t have to be expensive. Many projects use items you already own.
Pick a theme that excites your child. Popular choices include nature, space, or fairy tales. Ask them what they’d enjoy most. Their input keeps them engaged.
Choose a color scheme wisely. Bright colors energize a room. Soft tones create a calming vibe. Stick to 2-3 main colors for balance.
Sketch your ideas before starting. A simple drawing helps visualize the final look. It also prevents costly mistakes. Planning saves time and effort.
Tools and Materials Needed for Safe and Kid-Friendly Crafting
Gather kid-safe tools first. Scissors should have rounded tips. Non-toxic glue and paint are must-haves. Safety always comes first.
Use materials that suit your project. Cardboard, fabric, and paper are versatile. Stickers add instant flair. Washable markers let kids draw without worry.
Protect surfaces during crafting. Lay down old sheets or newspapers. This makes cleanup easier. Keep a damp cloth handy for spills.
Supervise young children closely. Some steps may need adult help. For example, cutting hard materials requires caution. Stay present to guide them.
Tips for Choosing Age-Appropriate Designs and Activities
Match projects to your child’s age. Toddlers enjoy sticking stickers or painting blobs. Older kids can handle detailed tasks like stenciling.
Keep instructions simple. Break steps into small chunks. For example, “Glue the stars first, then add glitter.” Clear guidance prevents frustration.
Avoid overly complex designs. Intricate patterns may overwhelm beginners. Start with basic shapes. You can always add details later.
- For toddlers: Use finger paints or sponge stamps.
- For preschoolers: Try paper cutouts or foam stickers.
- For older kids: Introduce weaving or decoupage.
Encourage creativity but set limits. Let kids choose colors but suggest sticking to the theme. Balance freedom with structure. This keeps the project cohesive.
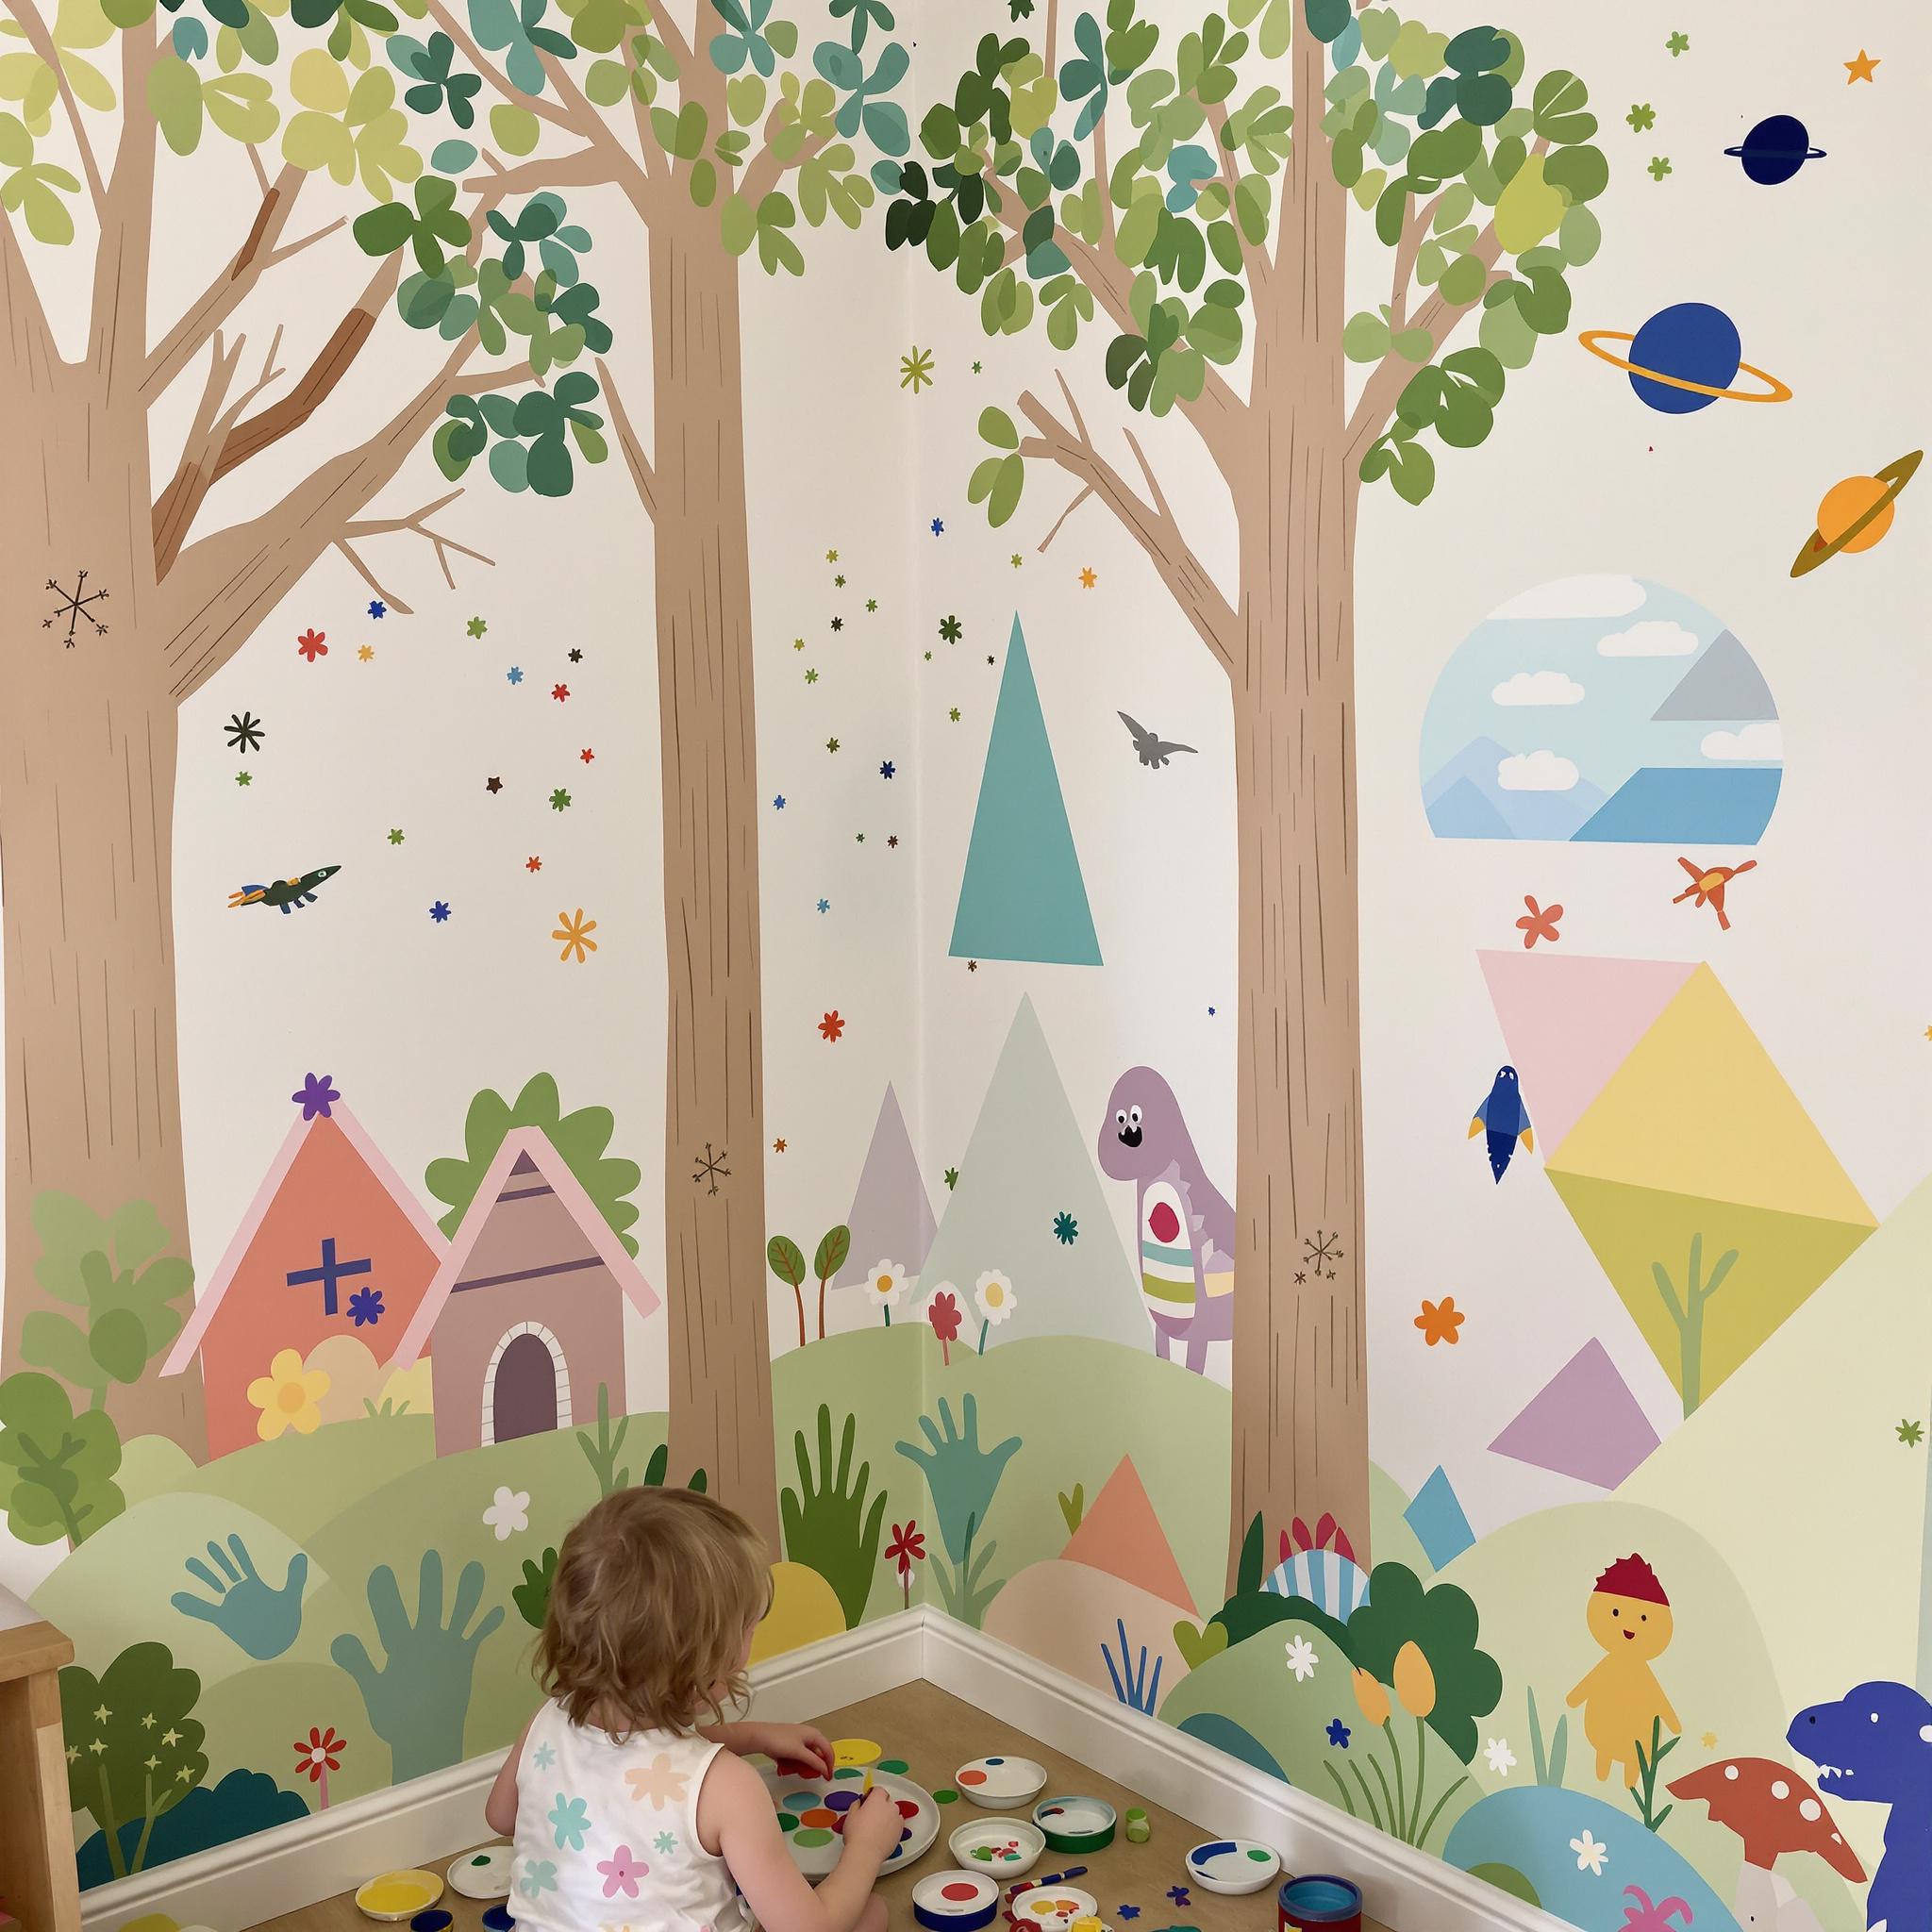
Creative and Easy Wall Art Ideas Using Paint
Paint is magical. It turns walls into something special. Want your kid’s room to feel unique? Painting is the way to go. You don’t need to be an artist. Stencils make it easy. Grab some at a craft store or DIY with cardboard and a knife. Stars, moons, animals, initials—anything works. My nephew wanted dinosaurs. The result? Pretty awesome.
Handprint art is another winner. Messy? Sure. Fun? Absolutely. Dip tiny hands in non-toxic paint. Press them on the wall to make trees, flowers, or random designs. I did this as a kid. Years later, my cousin framed one of our handprints. Now it’s a keepsake in her living room. For something bigger, try a mural. A mountain range or giant tree works. Let the kids join in—they’ll love it.
If freehand feels scary, use painter’s tape. Tape off sections for stripes or geometric shapes. Peel it off after the paint dries. Clean lines, no stress.
Crafting with Decals and Stickers: Customizable Options for Various Themes
Decals and stickers are lifesavers. They’re removable, cheap, and come in every theme. Space adventures? Fairy tale castles? Done. My sister used ocean decals once—fish, mermaids, seaweed. Two years later, she switched to jungle animals. No repainting, no hassle.
Feeling crafty? Make your own decals with adhesive vinyl and a Cricut machine. Add names, silhouettes, anything. Use matte vinyl for a seamless look.
Some decals are interactive. Dry-erase ones let kids write or draw right on the wall. Perfect for chore lists or reminders. Fun and practical.
Hanging Decorations: Paper Crafts, Fabric Banners, and String Lights
Hanging decorations add texture without drilling. Start with paper crafts. Remember paper chains? Still cool. Cut colorful strips, loop them, and hang them up. Origami shapes like butterflies or cranes work too. Hang them at different heights for a whimsical touch.
Fabric banners are cute. Spell out words like “Dream” or “Adventure.” Or sew triangles for a bunting flag. My niece made one for her dollhouse. Her mom loved it so much, it ended up in her bedroom.
String lights are cozy. Drape them around shelves or ceilings. Fairy lights, globe lights, star-shaped ones—all great. Dimmable or color-changing lights? Even better. Falling asleep under twinkling lights feels magical.
Upcycling Projects: Turning Old Items into Unique Wall Decor
Upcycling is fun and eco-friendly. Got an old skateboard? Mount it as a shelf. Broken guitar? Paint it bright and add hooks for hats or bags.
A friend turned a wooden ladder into a bookshelf. She leaned it against the wall and added shelves between the rungs. Functional and creative. Kids’ rooms are perfect for projects like this. They spark imagination and teach sustainability.
Frame vintage fabrics, maps, or wallpaper scraps. Group them for a gallery wall. Don’t toss mismatched puzzle pieces either. Paint them, add magnets, and stick them on the fridge—or a magnetic board.
Interactive Wall Features: Chalkboard Paint, Magnetic Boards, or Felt Play Walls
Interactive walls are genius. Chalkboard paint is a favorite. Paint a section—or the whole wall—and let kids doodle. Wipe it clean with a damp cloth. Our playroom became a doodle station. Love it.
Magnetic boards are great too. Use magnetic primer, then regular paint. Add alphabet magnets or shapes. Pro tip: Pair with whiteboard paint for dry-erase use.
Felt play walls are trendy. Attach felt to the wall and cut out shapes—animals, vehicles, whatever. Felt sticks to itself, so kids can move pieces around. Quiet, mess-free, and fun.
Seasonal and Holiday-Themed Decor That Can Be Updated Regularly
Seasonal decor keeps things fresh. Think pumpkins for Halloween, snowflakes for Christmas, hearts for Valentine’s Day. Keep it simple. Paper cutouts, garlands, or decals work.
Invest in versatile items. String lights can be paired with colored bulbs or ornaments. Swap pillow covers or blankets for the season. Let kids help. Their creations are often the best part.
Try a “seasonal corner.” A bulletin board or shelf where you rotate decor saves time. It gives kids ownership of their space. Watching their faces light up when they see a new setup? Priceless.

Tips for Involving Kids of All Ages in DIY Wall Decor
DIY projects are more fun when the whole family joins in. But getting kids of different ages involved can be tricky. Here’s how to make it work.
For toddlers and preschoolers, keep it simple. Give them stickers, foam shapes, or washable paints. Once, I gave my three-year-old a paintbrush. He ended up painting his toes instead of the wall. It wasn’t what I planned, but he loved it. That’s what counts. Just lay down a drop cloth first.
Older kids can handle more responsibility. Let them cut stencils with safety scissors or help with light sanding. My ten-year-old niece helped me stencil her bedroom wall. She picked the colors and loved feeling like she contributed.
Teenagers? They want something cool and Instagram-worthy. Let them brainstorm ideas or sketch designs. Don’t underestimate their tech skills. My nephew used Canva to create a killer digital mock-up for his room.
Executing Complex Projects Without Stress: A Step-by-Step Guide
Big projects can feel overwhelming. The trick? Break them into smaller steps. It works every time.
Start by gathering all your materials. There’s nothing worse than realizing you’re missing something halfway through. Trust me, I’ve been there. Then tackle one part at a time. For example, if you’re making a gallery wall, measure and mark where each piece goes. Hang one item, step back, and admire your progress before moving on.
Set realistic expectations. Not everything has to look perfect. Imperfections add character. Last summer, I smudged a mural I was working on. Instead of stressing, I turned the smudge into a “cloud.” Problem solved.
And don’t forget music. Whether it’s Taylor Swift or classic rock, a good playlist keeps things fun.
Maintaining and Updating DIY Wall Decor Over Time
Wall decor doesn’t last forever without some care. Dust builds up, colors fade, and trends change. Here’s how to keep it fresh.
Cleaning is key. For painted walls, use a soft microfiber cloth and mild soap. Avoid harsh chemicals that can damage finishes. If you’ve used fabric elements like tapestries, vacuum them gently with an upholstery attachment.
Updating decor is another story. Maybe you want to switch from bold colors to neutrals as your taste changes. Try layering new pieces over old ones. I added minimalist frames to an existing gallery wall, and it made a big difference.
Sometimes updating means starting over. And that’s okay. Change keeps things exciting. Plus, it gives you a chance to try something new.
Cleaning and Care Tips for Long-Lasting Results
Now let’s talk about how to care for different types of wall decor so it lasts.
- Painted murals: Seal them with a clear matte varnish to protect against scuffs.
- Wood accents: Wipe with a damp cloth and polish occasionally with wood conditioner.
- Fabric hangings: Spot clean stains right away and avoid direct sunlight to prevent fading.
Here’s a thought: rotating decor can extend its life. Moving pieces around prevents wear in one spot and keeps your space fresh.
Showcasing Finished Projects: Documenting and Sharing Online
Once your project is done, show it off. Instagram and Pinterest are great places to share your work. Take well-lit photos, add a catchy caption, and watch the likes roll in.
Go beyond just the finished product. Document the process—brainstorming, building, and finishing—in a blog post or video. People love behind-the-scenes content. It might even inspire someone else to start their own project.
Use hashtags like #DIYDecor or #HomeMakeover to reach more people. Who knows? You might go viral!
Inspiring Further Creativity: Encouraging Kids to Design Their Next Project
The best part of DIY projects? They spark creativity. After finishing one, ask your kids, “What’s next?” Chances are, they’ll have lots of ideas.
Encourage them to dream big, even if their ideas seem wild. That’s how innovation happens. Maybe they’ll want glow-in-the-dark constellations on their ceiling or a giant chalkboard wall. Whatever it is, support their vision.
After making a paper flower garland with my daughter, she decided she wanted a whole “garden” on her wall. We worked on it together for weeks, and now it’s her favorite spot. Creativity leads to more creativity.
Conclusion
DIY wall decor isn’t just about making your home look nice. It’s about creating memories, fostering creativity, and having fun. Whether you’re crafting with your kids or working solo, enjoy the process. The best designs tell a story.
FAQs
- How do I involve toddlers in DIY projects?
Toddlers can stick stickers or paint with washable colors. Keep activities short and supervise closely. - What tools are safe for older kids to use?
Safety scissors, non-toxic glue, and lightweight hammers are good options. Teach proper use and supervise until they’re confident. - How often should I update my wall decor?
Update whenever inspiration strikes. Seasonal changes or yearly refreshes are common. - Can I repaint a mural without ruining the wall?
Yes, but prep first. Sand lightly, clean the surface, and apply primer for smooth coverage. - How do I clean delicate fabric wall hangings?
Vacuum gently with an upholstery attachment or spot-clean with a damp cloth. Avoid soaking. - What’s the best way to document my DIY projects?
Take progress photos, write notes, and create a scrapbook or online album. Videos are also great. - Where can I share my finished DIY decor?
Share on Instagram, Pinterest, or TikTok. Use hashtags like #DIYDecor to connect with others. - How can I encourage my kids to come up with ideas?
Ask open-ended questions, browse inspiration together, and celebrate their suggestions. - What if my project doesn’t turn out perfectly?
Imperfections add charm. Embrace them or tweak the design to incorporate unexpected elements. - How do I store unused decor materials?
Organize supplies in labeled bins. Store fragile items carefully in a dry, accessible place.